How do I add, change, setup, install email signature Outlook 2013
Install your HTML email signature in no time! Use our signature installer or follow our step-by-step guides to install your email signature in Outlook 2013.
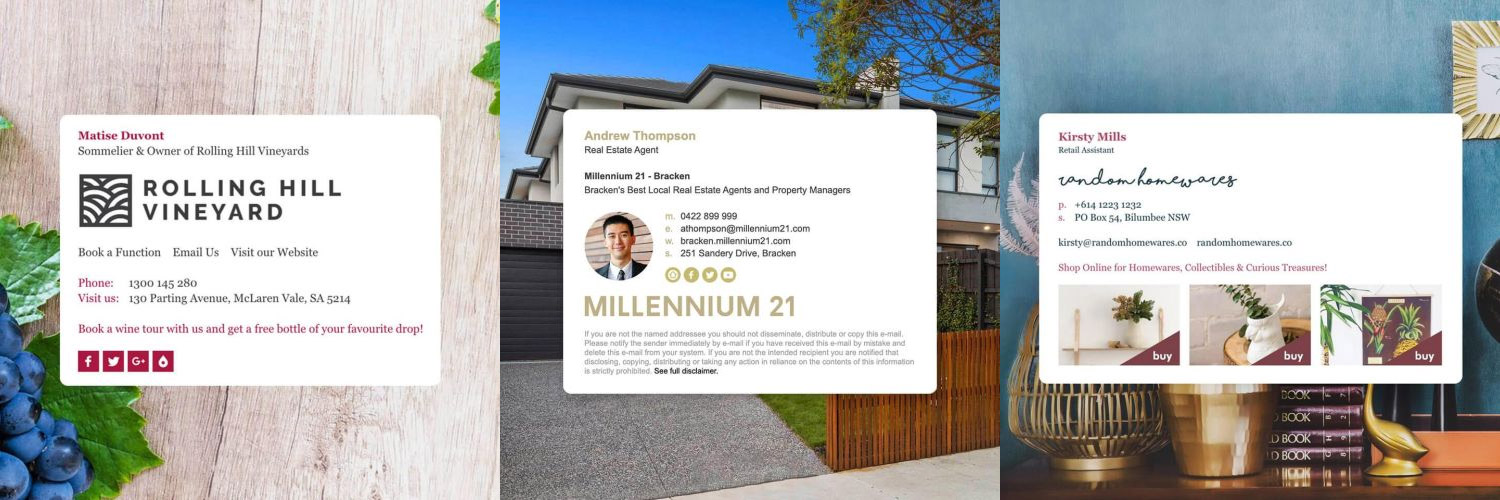
It's never been easier to create a new email signature for Outlook 2013. Check out our beautiful email signature templates and easy to manage email signature software, that makes creating email signatures for Outlook 2013 a breeze.
Before you start
You will need:
- To make sure you have chosen the correct guide for your version of Outlook. If you're on Outlook 2013 on Windows then you've chosen the correct guide. If you haven't got the right guide, you can select the correct guide here.
- Your email signature file (.html file) open in your web browser, or be logged into your Email Signature Rescue account with your signature open in Full Screen Preview.
- To have Outlook 2013 on Windows open.
Next Step
If you are using an email signature HTML file created by our Email Signature Rescue software, click on Get Started: Windows 7/10 Installer App for a quick and easy HTML email signature install into Outlook 2013. This will complete the Advanced Installation process for you, resulting in much better image quality and attachments not showing in most email clients. You can read more about this in our Troubleshooting FAQ.
If you do not have a HTML file created by our Email Signature Rescue software, click on Basic Installation Guide below to follow our written installation guide with screenshots (recommended). There is a Basic Video Installation Guide available if you prefer.
Our Advanced Installation Guide will fix issues such as blurry images and attachments showing in some email clients, however this is more technical than our Basic Installation Guide. Consider joining Email Signature Rescue to get access to our Installer App which completes the Advanced method of installation for you, if you are having trouble with this.
If you run into any issues during your HTML email signature installation in Outlook 2013 on Windows, please see the Troubleshooting FAQ for frequently asked questions, before contacting support through your member account.
Install: Signature Installer App
Installing your email signature via the app
Install your email signature once, then never worry again. Our signature installer app for Windows features auto-update functionality which syncs your email signature with our software, allowing it to automatically update when changes are made from your Email Signature Rescue account.
Download the Installer App for Windows
1Step One
Open the Email Signature Rescue Installer app and click the ( + ) button to add a new signature.
2Step Two
Select your email client.
3Step Three
Select the email account you want to install your email signature into.
4Step Four
Paste your email signature key. If you have HTML file instead of a key, click Use File, then click and select your saved HTML email signature file.
5Step Five
Select to insert for replies/forwards if you would like, then click Install Signature.
6Step Six
The app will install your email signature into your email client for you, and automatically update it if changes are made to it by the Email Signature Rescue account holder.
Installer app not working?
You can report an issue with our macOS Installer App here or via the app.
Install: Basic Guide (Copy & Paste)
1Step One
Download or save your HTML email signature file to your computer, then open it in your web browser.
2Step Two
Once the Email Signature is open in your web browser, press CTRL + A to highlight the signature, then press CTRL + C to copy the signature.
IMPORTANT: Do not use your mouse to select the area, only use Ctrl + A as you may miss out on grabbing some of the code.

3Step Three
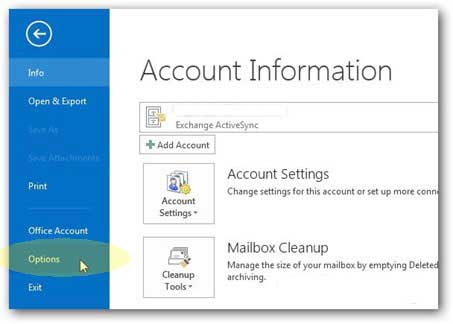
Open Outlook 2013 and click the File tab from your top toolbar, then select Options.
4Step Four
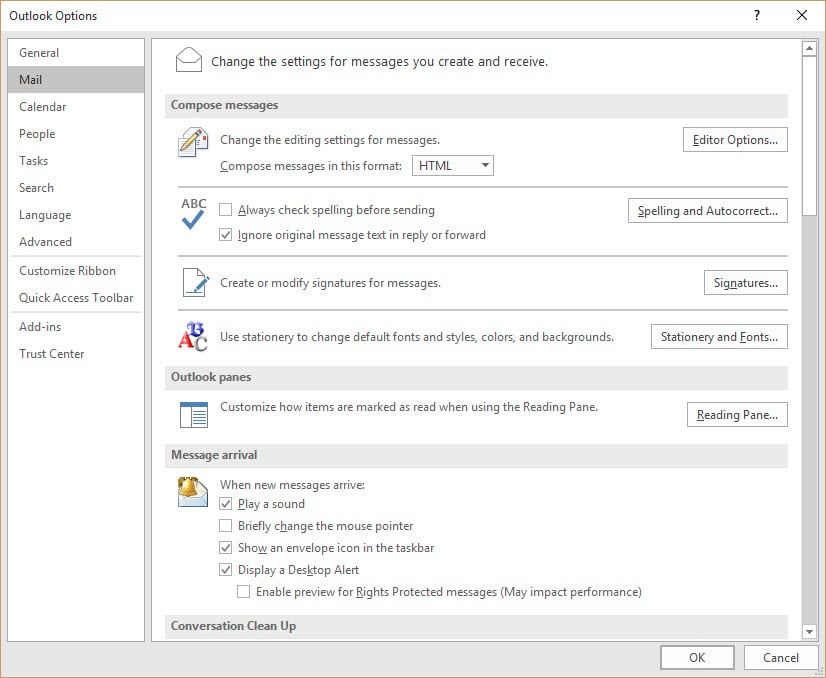
Select Mail on the left hand side and click the Signatures... button.
5Step Five
Click on New and type a name for your email signature, then click OK.
6Step Six
Paste your copied signature using CTRL + V into the signature field.
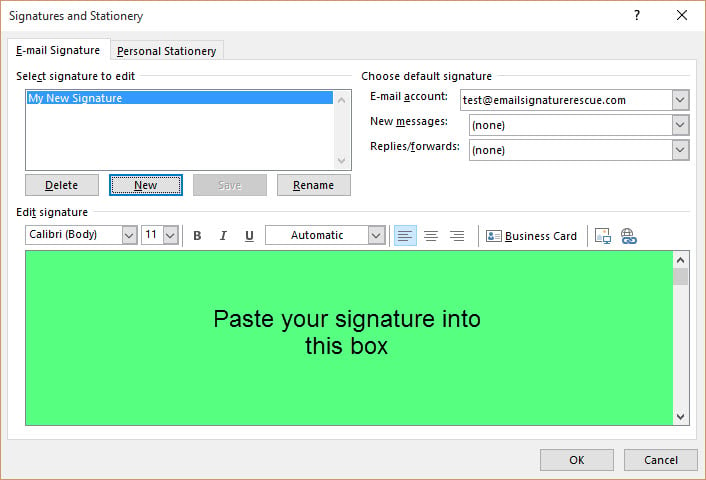
NOTE: If the email signature preview in the settings area is cutting off your email signature, do not worry, this is expected and is due to the way the signature preview renders HTML signatures. Simply send yourself a test email and you will see it displays correctly.
7Step Seven
Set your email signature as the default for new messages and replies/forwarded emails if you like, then save your changes.
Congratulations! Your email signature is now installed and ready to use!
Install: Advanced Guide (Recommended)
This is our advanced guide for installing a HTML email signature in Outlook 2013. These instructions should be followed if:
- the Signature Installer App can't find your email account
- you want images to be less blurry
- you don't want images to show as attachments in some macOS email clients
- you want your images to update when making changes from your Email Signature Rescue dashboard
Watch the Advanced Video Guide
Rather watch how to install your email signature? Check out the video below for full step-by-step instructions on how to install your email signature in Outlook 2013 via the Advanced Install.
Please note that as per the video below, the installation instructions for Outlook 2013 are the same as Outlook 2016.
Read the Advanced Video Guide
1Step One
Download your HTML email signature file to your computer from your dashboard, or if you have had it emailed to you, then save it in an accessible location.
2Step Two
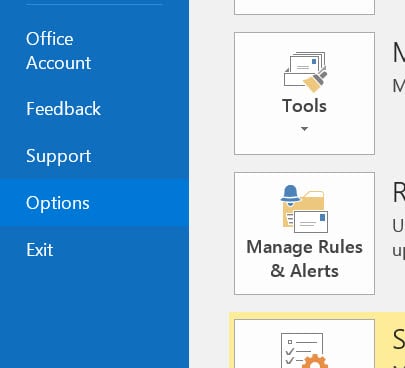 Open Outlook 2013 and go to your Signature settings. You can get there by selecting File > Options > Mail > Signatures...
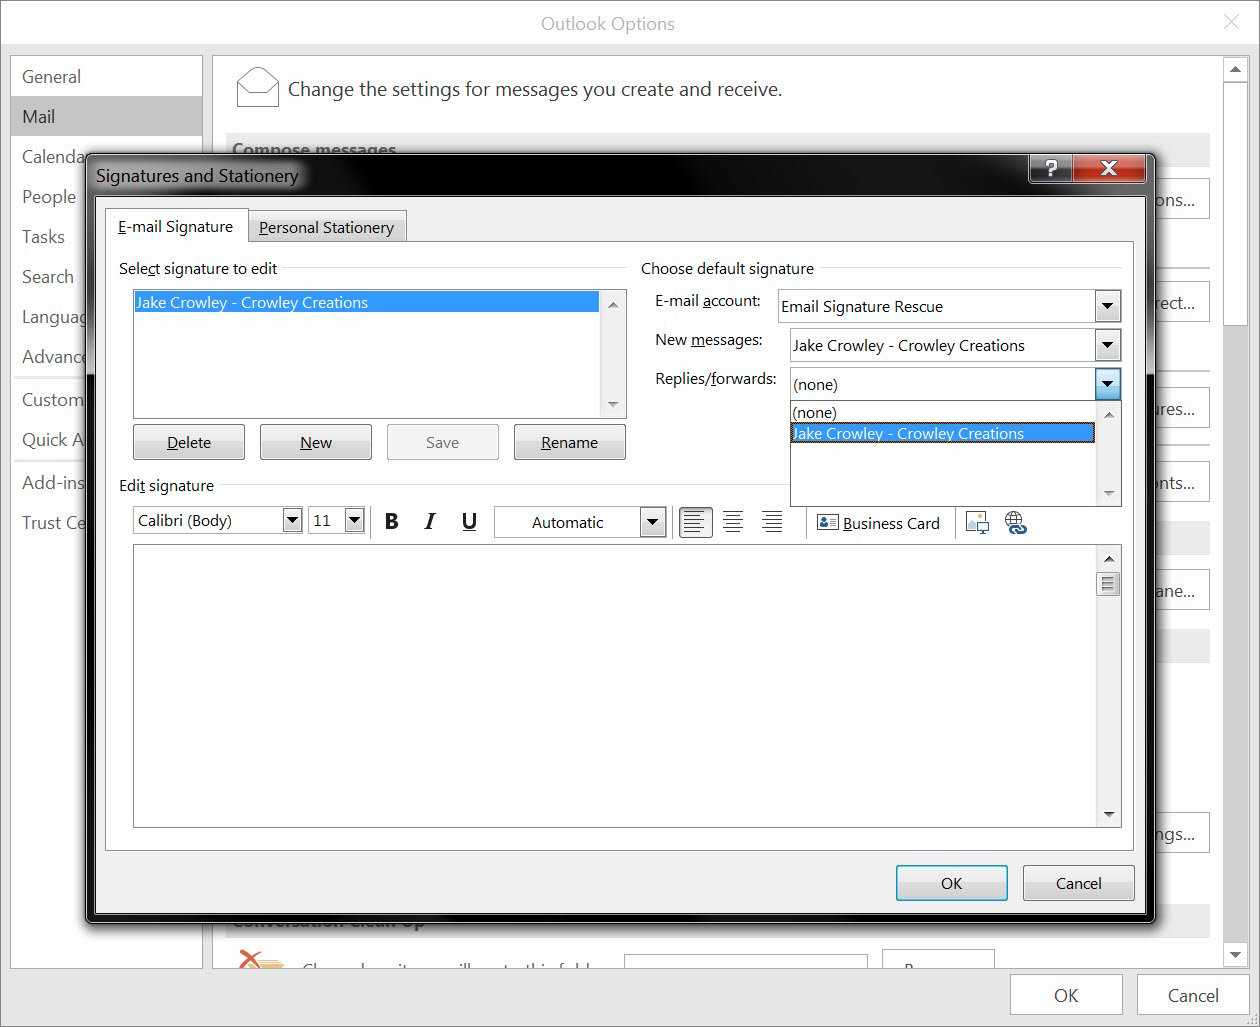
Create a new signature and enter a name, then click OK.
On the right hand side, assign that signature to send with New Messages and Replies/Forwards.
3Step Three
Click OK so you're back to the Outlook Options window, then whilst holding Ctrl, click the Signatures... button.
File Explorer should open up to the file location of your Outlook signature files and in here you should see 1 folder and 3 files with the name of the signature you just created.
4Step Four
Delete the .htm file, then navigate to the email signature file we created earlier, copy it and paste it into the Outlook file location. Rename this file with the same name that the deleted file had which will be the same as the other two files. Make sure that the extension is .htm and not .html.
What you've essentially just done is replaced the Outlook created signature file with your own code so that Outlook can't edit your signature or code.
Congratulations! Your email signature is now installed and ready to use!
NOTE: If this Advanced process is too hard, try the Easy Guide above. You can also check out the Troubleshooting tabs below for further help. If you're a member, contact support through your member account for additional help.
Troubleshooting: FAQ
If you have tried all of our installation methods for Outlook 2016 and you run into any issues, please read through this troubleshooting guide before contacting Support for further help.
Email Signature Rescue members:
We now have a Windows 7/10 Installer App that will install your email signature in Outlook 2013 in a jiffy!
Download Windows Installer App (64-bit)Why can't the Signature Installer App find my mail account?
If your email account is an Exchange account then the Signature Installer App won't be able to recognize your mail account when attempting to install your email signature. We are currently adding functionality to the app so it will recognize Exchange accounts.
Until this is available, you can follow the Basic or Advanced Installation Guide to have your email signature installed within minutes.
When should I use the Advanced Instructions?
You should use the Advanced Instructions if you:
- are using a HTML email signature file produced by our Email Signature Rescue software but cannot install your email signatures using our Installer App and have been advised by Support Staff to follow these instructions instead
- are having issues with installing your email signature using our Basic Installation Guide
- want images to be less blurry
- want images to not show as attachments in some Mac email clients
The reason the images may be blurry using our Basic Installation Guide, is because when you paste the email signature into the settings, Outlook saves your images and compresses them, and then attaches them to the email message in it's own way. If you paste the HTML directly into Outlook's created HTML file and override the Outlook created HTML (following the Advanced Instructions or using our Installer App), it will no longer serve the blurry, compressed images that Outlook created, it will serve the images correctly, from the web server, as per your HTML file's instructions.
The images in my signature are still blurry or distorted and I'm using the Installer App or Advanced Installation Guide
If the images in your email signature are still distorted or quite blurry, it could be a display setting on your computer. Go to Control Panel > Display in your computer's settings. There you will see three text size options for 100%, 125% and 150%. If your computer is not set at 100%, it can cause the signature to look distorted when it's pasted in. Change the settings to 100% and press Apply to save them. Then re-install the email signature.
My email signature images are showing as attachments in some email software
If you are concerned about images showing as attachments when you send emails to some Apple Mac email clients, use the Installer App or Advanced Instructions to install your email signature. As explained above, this will force Outlook to use the images located directly on the web server, and not the ones it creates, compresses and attaches instead.
My email signature does not look right when I paste it into Outlook 2013
First check - has the user selected all of the HTML?
A majority of the time when this happens, the user installing the signature has not copied all of the relevant code before pasting it into Outlook 2013. To ensure that all of the code from the signature is copied, the user needs to use Ctrl A to select the signature when open in the browser or full screen preview and Ctrl C to copy it.If the user uses their mouse to select the code, they may not select all of the HTML for the signature to work correctly, which will cause the signature to look different when pasted in.
Second check - has the user deleted all prior HTML/ characters/text from the signature settings box before pasting?
You need to make sure you delete everything from the signature box before you paste the signature in. If you do not delete everything before you paste your signature in, it will not work correctly. Delete all of the email signature from the signature settings box by selecting it all (Ctrl A) then hit Delete. Make sure that your cursor is at the top left of the signature box and you cannot select anything inside the box. You should not be able to move the cursor anywhere, it should remain in the top left corner. You may not be able to see it, the only way to ensure you have deleted it all it to double click around inside the box and delete anything you find. Now copy and re-paste in your email signature, using only Ctrl A, Ctrl C and Ctrl V.
Third Check - does the User have their text size display settings set higher than 100% in the computer settings?
To find this out, go to Control Panel > Display in your computer's settings. There you will see three text size options for 100%, 125% and 150%. If your computer is not set at 100%, it can cause the signature to look distorted when it's pasted in. Change the settings to 100% and press Apply to save them. Then re-install the signature following our guide.
The email signature preview box cutting off email signature view in Outlook 2013
We have noticed that the preview box in the Outlook 2013 email signature settings may cut off your HTML email signature preview. Usually the email signature has been pasted in correctly, so do not touch it at all once you have pasted it. Double check if your email signature is installed correctly, by composing a new email message instead and sending a test email to yourself.
When I compose an email message, it's composing in plain text
If you don't see any images or colors, or your email signature has lost it's formatting when you compose a new message, it's most likely that you have your compose settings are set to plain text. Go to your compose settings and change it to HTML. See this article for more information.
Need more help?
Please contact our Member Support Team through your Email Signature Rescue account using the red help button for direct assistance.
Troubleshooting: Where do I find my email signature HTML file
- If you are an Email Signature Rescue member and are logged into your account, you can download your HTML file directly from your Dashboard, by clicking on the Download button.
- If you have been emailed your HTML file, go to the email and open the file in Google Chrome or Mozilla Firefox.
- If you have your HTML file saved on your computer hard drive, navigate to where you have saved the HTML file and open with Google Chrome or Mozilla Firefox.
Troubleshooting: I don't have an email signature HTML file
If you don't have an email signature HTML file, consider joining Email Signature Rescue now and get creating! We offer over 20 professionally designed and tested email signature templates, tools and features to create and manage your email signatures online and a whole lot more.


